Latest robot project – A desktop social robot
February 26, 2017 Leave a comment
I have been working on a new robot project for the last few months. I like desktop robots and having read about social robots like Jibo and Buddy I decided I would like to try and create a low cost version of one of these that can sit next to my computer and maybe interact with me and my children. I wanted to try and design some more complex components for 3D printing and thought that this project would be a good opportunity. I decided to give FreeCAD a shot as it looked like a promising open source 3D design package. After negotiating the expected learning curve I was impressed with the range of functionality that FreeCAD has and I was able to design some cool looking parts for my new robot. The idea was to design a desktop robot with a display and a camera integrated into the head and use servos to pan and tilt the head to enable to robot to look around the room. As the project progressed, as is often the case, it evolved and the robot ended up with an extra servo that enabled the head to roll as well. I wanted to incorporate an accelerometer into the head to track its position and went with a cheap MP6050. For the display I used an adafruit 2.2″ tft screen that I have used in previous projects. I had a webcam, that I stole from my mobile robot that I mounted in the head as well. I also used this project as an excuse to learn how to use kiCAD for pcb design. I used this to design a shield for the arduino mega to interface all of the sensors and servos.
Below is a picture of the finished robot.
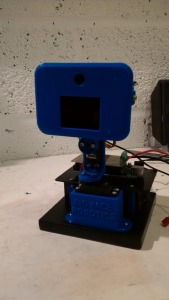
Social robot
I was particularly pleased with the lettering on the bottom servo housing, easy to do with FreeCad. I was also pleased with the bracket that connects the roll and tilt servos, as shown below.
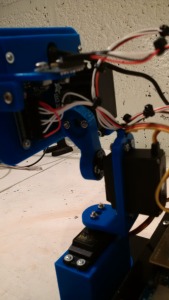
Roll to tilt head bracket
The accelerometer mounts to the head and, using this library, is able to spit out roll, pitch and yaw angles.
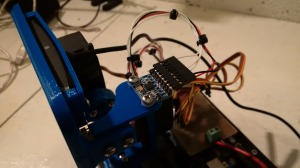
MP6050 mounted to head
After some calibration I have been able to control the servo positions using the accelerometer readings very reliably. A simple control loop for each servo is all that is required to position the head at any combination of roll, pitch and yaw angles.
I have a lot of work to do on the software, but I wanted to share the project now that the mechanical and electronic build is complete. I was going to use the raspberry pi for this project but I have decided to use my desktop computer for now, but I may decide to use the pi at a later date. Previously I was driving the tft screen from the pi but I am now writing to the screen from the Arduino. The screen will display a face, probably just simple shapes for now, to allow the robot to display some emotions.
I am also planning to design a robot arm it some point, and I would like this robot to be able to control the robot arm. I am thinking of possibly having a few modular parts, like arms or other sensors, that can work together. I am not sure how this will happen at that moment but its fun to think about.
Come back soon as I hope to have a video of the head moving around and controlling its position up here when its working.
