Robot Head Mark 2

Around 3 months ago I started a new robot project. I decided that I wanted to build another robot head that could sit on a desktop. I had a few goals in mind when starting the project. I wanted to 3D print the parts and try out some finishing techniques on the parts. Nothing too fancy, just sand them smooth and paint, to see how good a finish I could achieve. I also wanted the robot to be low-cost and simple. I mean really simple, just two servos and a couple of sensors. This was very intentional. I want to expand on the work of my previous project, the desktop robot head and arm, by concentrating on the software. I found I was too often dealing with mechanical issues or limitations and these were an all to welcome distraction from the software. I like making things and having something physical to show for the hard work, whilst I find that with software there isn’t always that sense of satisfaction of having created something. However, the software is where the robot really comes to life and I need to get better and more focused at writing it and implementing the ideas that I have. To that end I wanted a simple robot with very little to go wrong that can serve as a platform to develop some interesting functions. This project will hopefully pull together a lot of the work from previous projects into one robot, and I intend to craft the software with care. I want to squeeze as much functionality out of this simple robot platform as possible. I also wanted to take the opportunity of a new project to switch from using TKinter for the GUI to using wxPython.

I started the process by designing the robot in FreeCad. I did more design work on this than in previous projects and really spent my time on the modelling. I even put the parts together into an assembly to help decide on the colour scheme. I have started another youtube series following the design and build of the robot. Part 1 is below.

This video shows the design and printing of the robot and at the end of it I had a pile of 3D printed parts ready for finishing. The design is a simple pan/tilt robot head, with a camera and a sonar sensor mounted in the head. I want to build on my previous work with point clouds so I wanted a sonar mounted on the head. I don’t think I will end up creating point clouds with this robot but I will likely use the techniques to come up with a different way to represent the environment. However, I didn’t want the sonar sensor looking like the robots ‘eyes’ as they often do, so I tried something new with this project. I printed a mesh to mount in front of the sonar and, combined with a piece of filter fabric, made a cover for the sensor. Later testing would reveal if this was successful or not.  The only other feature of the head was the robots actual ‘eye’. In place of the TFT screen used in the last project I opted for an RGB LED in a custom enclosure that would furnish the robot with a single colour changing eye that it can use to attract interest or convey emotions.

Part 2 shows the finishing of the 3D printed parts.

This involved a lot of sanding and priming before finally painting the parts. I was overall really pleased with the finished parts. It become clear from this process that the quality of the final finish is directly proportional to the amount of finishing work put in. I also took away a few other lessons from this process when designing the parts for finishing. Sharp corners and deep recesses are difficult to sand and remove all of the build lines without removing too much material. Smooth, rounded surfaces or large flat surfaces are easier to sand and look good when painted.

Part 3 of the video series documents the assembly of the robot.

With the robot assembled I was able to do some testing. I decided to use an Arduino Nano for this project, in-keeping with the minimalist and simplicity goals of the project. I knocked up a bread board circuit for testing and set about testing the RGB LED eye and the sonar sensor. Good news was that the sonar still seemed to function just fine from behind its cover, and the RGB LED worked as expected.

I initially connected the RGB LED to digital outputs, thinking that the few colours that this yields would suffice. I subsequently decided to use PWM outputs, so that a wider range of colours could be generated. Given that the robot was so simple, I thought this was a reasonable extravagance.

Part 4 shows testing of the RGB connected to PWM outputs and the first test of the servos.

This video also represents my first simple programs written using wxPython. So far, I like it. The GUI’s look better than their TKinter counterparts and overall it is not much more complex, if at all. I created a couple of test programs, one that sends commands via serial to set R,G and B values for the LEDs and another that sends servo positions. Code for the Arduino has also been written to receive these commands and set the RGB outputs and servo positions accordingly. I can also send get commands to the Arduino and it will return values as appropriate.

This brings us almost up to date on this project. There will be a new video soon, so be sure to subscribe to my youtube channel. I have been working on embedding OpenCV images and MatPlotLib plots in wxPython windows, as well as making a more permanent circuit for the robots electronics.
Replaying sequences, and some thoughts…

Part 4 of my Youtube series on my desktop robot head and arm build is now available. This episode shows the robot replaying some sequences of movements, along with some new facial expressions. I was exploring how well the robot was able to convey emotions and, even with quite basic movements and facial expressions, I think it does a reasonable job. Check out the video here.


Now for some thoughts…

It’s at this point in a project that I normally reach a cross roads. On the one hand the mechanical build is complete and the electronics, although there is more to come in this project, are working as required. These are the aspects of robot building that I enjoy the most. However, I really want the robot to do something cool.  I find myself shying away from the software in favour of starting a new project where I can fire up the 3D printer and the mill. I often put this down to not having an end goal in mind for the robot and the associated software. So I am going to use this space to jot down some thoughts about this that may help me keep on track. I have made notes about some features that I would like to implement in the project which I will list below. Some are quick and fairly easy, others are going to take some time. Whether I ever get them all completed will remain to be seen, but this will prove a helpful reminder should I need to come back to the list.

  • Program and replay poses/sequences from the GUI
  • 3D model of the robot on the GUI for offline programming or real-time monitoring
  • Face detection and tracking
  • Face expression detection (smile or frown) and react accordingly
  • Automatically stop the arm when the hand switch is activated
  • Detect someone and shake their hand
  • Gripper?
  • Remote control/input to the robot via bluetooth (I have a module on the way) maybe an android app?
  • Program the robot to play simple games
  • Object detection and recognition
  • Voice input and sound/speech output
  • Mapping of visual surroundings and reacting to changes
  • Use the robot as a platform for AI development. I have worked on this in the past, trying to use neural networks to allow the robot to have some hand-eye coordination
  • Sonar/IR sensors to sense the area in front of the robot and react to changes

This is just a preliminary list of features that I think would be interesting. I will certainly return to this list myself as a reminder to keep me on track. If anyone has any other suggestions, please leave a comment as I am interested in what other people would consider useful/fun.

My ultimate goal for this project is to have a robot that can sit on my desk or in my lounge, and interact with me and my family. It may sit idle, waiting for someone to activate it, before offering a suggested game or activity. It may begin moving under its own volition, learning its environment, building a model of its world and own self, ready to react to any sensed changes. It may get bored and lonely, and make noises until someone comes to see what the robot wants and play a game. I am not sure but this is where I want the project to head. Ultimately, I will want all processing to be done on-board, so that the robot can be moved around (a Raspberry Pi is a likely candidate to achieve this).

I will keep you all updated on the progress of this project. I think small steps are required to implement each of the features above in turn. I am hoping that eventually I will be able to join all of the features together into an interesting final product.  Until next time, thanks for visiting!

EDIT: I have put my code on to Github here. This is early days in this project but I like to share, especially if it helps someone out!

Workshop improvements

Not much going on robot-wise at the moment as I’m in the process of improving my garage/workshop. I’ve made a new page titled workshop to document my progress (have a look near the top of this page). This will keep me busy for quite a while I would imagine! I’m looking forward to having this complete as I’ll have an area for my PC, a soldering station and an area for the milling machine.

Video at last!

I finally got round to tidying up the wiring on my humanoid robot and repairing the wiring on a potentiometer that got damaged when I removed it from my previous project. More importantly I spent some time on a video to show the robot in action. Check it out below!


Not much autonomy yet, except for the head when tracking an object. The next job is to continue work on the software. I need to write software to save and load a set-up file for the robot containing servo end points as not all of the servos can move to their full extents without hitting something. The next task after that is to write software to store and replay a series of moves. Not exactly autonomous but it should look cool!

Man space and new toys

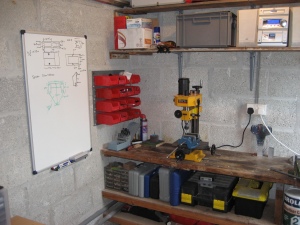
I have recently moved house and as such I am now lucky enough to have a garage, or as I like to call it, the man space!  I thought it would be a good time to treat myself to some new toys for building robots.  I purchased a milling machine along with various other tools for metal working.  So I’ve got my own little workshop with everything I need for my new project, a humanoid mark 2.  As you can see in the picture, I’ve got the milling machine, storage bins and a whiteboard!  I’ve made a good start on my new robot which I’ll share in my next post.

Catching up

I’m working on creating pages of my previous robot projects for posterity and you never know, they may be of inspiration to others.  I’m also going to get some pictures of my humanoid robot as its not going to be around for much longer.  It was due a redesign and a full rebuild so I need the parts for the improved version.

First post!

Hi everyone,  welcome to my blog.  I’m going to be posting info about my robotics projects for everyone to see what I’m up to.

excitingtechnology.net

Facts and Thoughts on Technological Progress

Turing's Radiator

Diffucult Problems in Futurism

Mind the Leap

One small step for the brain. One giant leap for the mind.

Steve Grand's Blog

Artificial Life in real life

jimsickstee

Hi, I'm Jim. Read what I write and I'll write more to read.