Arm and hand

I’ve been a bit busy lately but I did manage to make some more progress on my robot today.  I’ve been working on the upper and lower arm sections and the hand.  I have intentions of putting a switch or two into each hand so that the robot can detect when it has touched something.  This will be used to stop the arm when necessary and also to help the robot build a representation of what is in its immediate surroundings. I’ve decided that for now the robot isn’t going to be equipped with a gripper and I would like the robot to be able to manipulate objects using both hands if possible.  One arm is complete and has the hand mounted without any switches for now.  I’ve stuck some rubber foam to the hand to help with grip and also to protect stuff as the robot flails around.  I’ve also stuck some electrical tape to the top of the hand.  I’ve found this works well when using the camera for colour recognition.  My future plans rely on the robot sensing hand position using the camera so this is useful.  Anyway, check out the picture to see where I’ve got to.

Progress report

I’ve constructed more servo brackets to make both shoulders, each with 3 degrees of freedom.  I’ve also made progress with the neck which is just a pan/tilt arrangement of 2 servos.  I’ve added the first potentiometer to the robot as well.  The next step is to make the potentiometer mounting brackets for the shoulder and start work on the upper arm sections which will probably be made from more 1″ angle aluminium with a mounting for the elbow servo.

Interface board

I’ve been quite busy today.  I redesigned the interface board that allows the arduino to be connected to the plethora of servos and sensors that will comprise my new robot.  I designed the circuit using Eagle and used the toner transfer method to transfer the design onto copper clad board and used ferric chloride to etch the board.  I’ve made quite a lot of home-made circuit boards now and I’ve developed a technique that works almost every time and gives nice, clean traces.  The interface board breaks out all of the PWM pins, all of the analogue input pins and eight of the digital i/o pins with pull-up resistors for connecting to switches.  I’ve also attached the battery and wired up a switch for the servo power which my previous robot lacked.  The interface board is attached to the robot and wired to the arduino, although I need to change some of the wiring and shorten some connections to keep everything looking tidy.  Next job is to start work on the servo brackets and mounts for the potentiometers.

Humanoid MK2

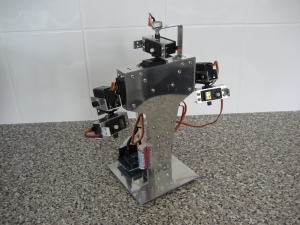
New robot! Always an exciting time.  So far the body and base of the robot is complete.  The milling machine makes cutting the openings for the servos to fit through an easy job.  Also drilling holes is a pleasure compared to using something like a battery drill.  When kitting out the garage I purchased a load of aluminium, sheet, angle, box section and flat.  Everything I will need for this build.  I also got myself a polishing kit to give the aluminium as shiny a finish as possible.  You can see in the picture that I have fitted 3 servos and have mounted the Arduino mega to the base plate.  I’ve got to dismantle my previous robot for parts so that will likely be my next job.  Have a look at my previous humanoid in the previous projects section to get an idea of how this robot will turn out. Similar to my previous humanoid but made to a higher standard and slightly smaller.  I’m going to make new servo brackets and arm sections as well as a new interface board to allow all the servos and potentiometers to be connected to the Arduino and powered.

Man space and new toys

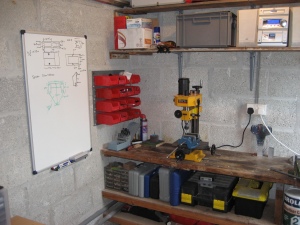
I have recently moved house and as such I am now lucky enough to have a garage, or as I like to call it, the man space!  I thought it would be a good time to treat myself to some new toys for building robots.  I purchased a milling machine along with various other tools for metal working.  So I’ve got my own little workshop with everything I need for my new project, a humanoid mark 2.  As you can see in the picture, I’ve got the milling machine, storage bins and a whiteboard!  I’ve made a good start on my new robot which I’ll share in my next post.

Catching up

I’m working on creating pages of my previous robot projects for posterity and you never know, they may be of inspiration to others.  I’m also going to get some pictures of my humanoid robot as its not going to be around for much longer.  It was due a redesign and a full rebuild so I need the parts for the improved version.

First post!

Hi everyone,  welcome to my blog.  I’m going to be posting info about my robotics projects for everyone to see what I’m up to.

excitingtechnology.net

Facts and Thoughts on Technological Progress

Turing's Radiator

Diffucult Problems in Futurism

Mind the Leap

One small step for the brain. One giant leap for the mind.

Steve Grand's Blog

Artificial Life in real life

jimsickstee

Hi, I'm Jim. Read what I write and I'll write more to read.